Virtual Campus Design
- iLRN2026 Virtual Campus design guidelines / template
- Debugging & Performance
- About Building in FrameVR + Advanced Interactions
- Frame Environment Building Options
- Using Scenes in FrameVR
iLRN2026 Virtual Campus design guidelines / template
iLRN 2026 Virtual Campus
[Frame ID + #] — [Frame Name]
(HUB = Hub/High Traffic Frame, CS = Community Space, SP = Special Project, BH = Branch House)
Development & Accessibility Checklist Template
[Campus Location Image or Map]
[Caption or additional information about space]
example: BH-05 Science, Technology, Engineering & Mathematics (STEM)
|
Frame Type |
(ex. Branch House, BH) |
Status |
OPEN |
|
Track / Branch |
(ex. STEM Education) |
Capacity |
(ex. 50 users) |
|
FrameVR URL |
[https://framevr.io/your-frame-url] **see Executive Workbench main spreadsheet |
||
Frame Purpose
|
[Describe the purpose of this Frame in 2–3 sentences. What is it for? Who is it for? What does it contribute to the campus?] |
|
Frame type context: [Frame type] — [brief description of frame type role and any curatorial notes specific to this track or space.] |
1 Ownership & Governance
|
Frame Lead / Owner |
|
|
Content Contributors |
|
|
Technical Steward |
|
|
Accessibility Reviewer |
|
|
Last Updated |
|
2 Learning Design Requirements — + UDL 3.0
|
[Frame-specific learning design note: Describe any particular learner diversity considerations, engagement challenges, or pedagogical requirements relevant to this track or frame type.] |
|
UDL: [Frame-specific UDL note — describe which UDL principles are most relevant to this track and how the Frame design should respond to them.] |
|
|
Universal Requirements (all frames) |
Criterion / Pass Threshold |
|
☐ |
Purpose statement posted in Frame at entry zone |
Visible within 10 sec of entering |
|
☐ |
Orientation cues for newcomers (what this space is, what to do) |
Confirmed by blind test with volunteer |
|
☐ |
Asynchronous contribution pathway available (forum, Codex, Discord link) |
At least 1 async pathway; URL live |
|
☐ |
Content accessible in text form via Codex (Representation — UDL) |
Codex page live and linked in Frame |
|
☐ |
No color-only navigation cues — all zones/portals have text labels |
Confirmed by reviewer |
|
☐ |
Emotional tone is welcoming; language is jargon-free at entry |
Confirmed by a reviewer external to Frame team |
|
|
Frame-Specific Requirements |
Criterion / Pass Threshold |
|
☐ |
[Frame-specific requirement 1 — describe a design or content requirement unique to this frame or track] |
[Pass threshold] |
|
☐ |
[Frame-specific requirement 2 — describe a second design or content requirement unique to this frame or track] |
[Pass threshold] |
3 Design & Build Checklist
|
|
Layout & Purpose |
Criterion / Pass Threshold |
|
☐ |
Frame purpose defined in one sentence, posted at entry |
Written purpose statement is visible |
|
☐ |
Environment size matches use case |
Appropriate environment selected; not over/undersized |
|
☐ |
Central meeting / focal area identifiable within 10–15 sec |
Walk-through test by the reviewer |
|
|
Navigation |
Criterion / Pass Threshold |
|
☐ |
Minimum 2 outgoing portal links to other Frames |
≥ 2 portals; 0 dead ends |
|
☐ |
Consistent portal visual language (campus-wide asset style) |
Matches campus portal standard |
|
☐ |
Navigation path from entry to any key area ≤ 15 seconds |
Timed walk-through by reviewer |
|
☐ |
All portal destinations confirmed live |
Click-tested by reviewer |
|
|
Signage |
Criterion / Pass Threshold |
|
☐ |
All text is legible on mobile screen at default eye level without zooming |
Phone screen test |
|
☐ |
No signage relies on color alone |
Label or icon accompanies all color-coded elements |
|
|
Zone Setup (if zones are used) |
Criterion / Pass Threshold |
|
☐ |
'Restrict all assets to zones' enabled if zones are in use |
Frame settings → restrict assets = ON |
|
☐ |
Each zone has a named purpose |
Zone names visible in Frame settings |
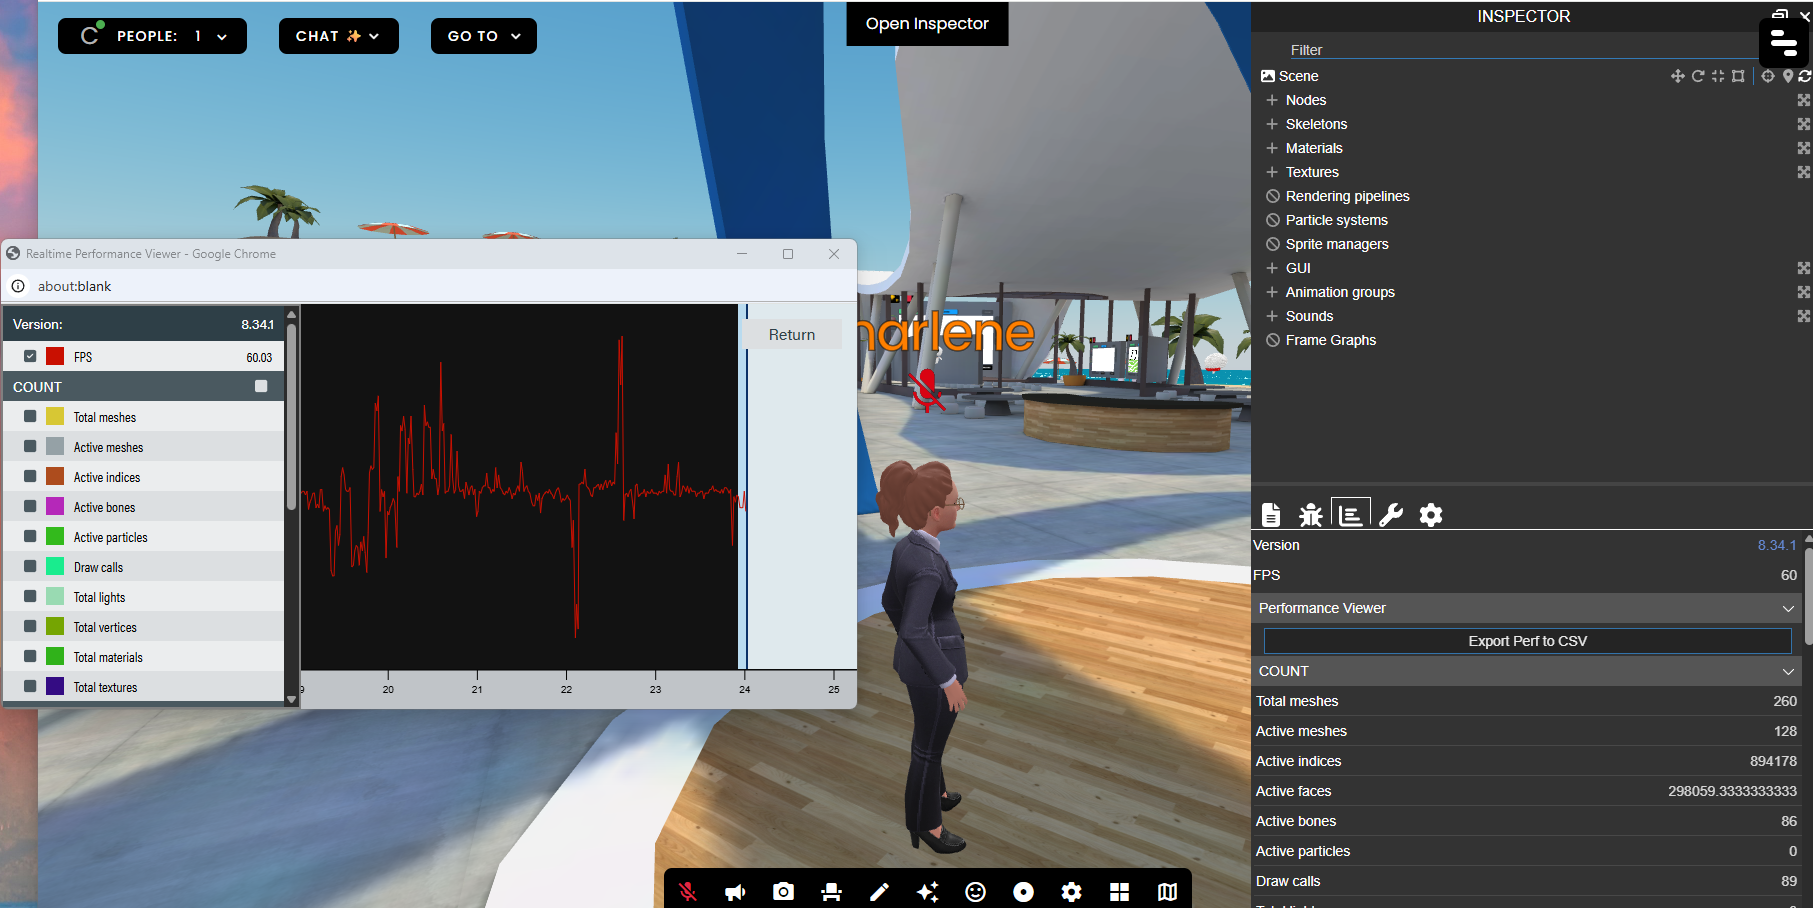
4 Performance & Asset Budget — check via Frame Settings → Performance Rating or ?debug=true
|
FrameVR targets: ≤ 200 draw calls · ≤ 130,000 active faces · ≤ 20 materials. FPS target: 60 desktop, ≥ 40 minimum desktop, ≥ 30 iOS Safari. |
|
|
Performance Monitor Readings |
Criterion / Pass Threshold |
|
☐ |
FPS ≥ 40 on desktop (Chrome/Edge) |
Target 60; below 40 = must fix |
|
☐ |
FPS ≥ 30 on iOS Safari mobile |
Must pass before launch |
|
☐ |
Draw call count ≤ 200 |
Babylon Inspector → Stats |
|
☐ |
Active face/poly count ≤ 130,000 |
Babylon Inspector → Stats |
|
☐ |
Material count ≤ 20 |
Babylon Inspector → Stats |
|
☐ |
Performance Rating not flagged RED in Frame Settings |
Yellow = caution; Red = block launch |
|
|
Asset Hygiene |
Criterion / Pass Threshold |
|
☐ |
All images compressed before import (squoosh.app) |
No raw camera/screen captures |
|
☐ |
No Sketchfab model imported without poly-count review |
Flagged models resolved or documented |
|
☐ |
Unused assets deleted (not just hidden) |
Assets list contains only active assets |
|
|
Media Settings |
Criterion / Pass Threshold |
|
☐ |
All videos set to NOT autoplay |
Each video asset → autoplay = OFF |
|
☐ |
Webcam/streaming screens disabled unless live event. |
Default OFF; enable only during live sessions |
|
☐ |
No Smoke particle effects in use |
High GPU cost; zero tolerance |
|
☐ |
Animated objects minimized |
Each loop adds ongoing GPU cost |

|
FPS Desktop |
|
|
FPS iOS Safari |
|
|
Draw Calls |
|
|
Poly Count |
|
|
Materials |
|
|
Perf. Rating |
|
5 Content & Boards Checklist
|
|
Codex & Community Links |
Criterion / Pass Threshold |
|
☐ |
Codex page URL embedded as board or link in Frame |
BookStack page URL live and linked |
|
☐ |
Forum / InVision Community thread linked |
Thread URL confirmed live |
|
|
Content Boards |
Criterion / Pass Threshold |
|
☐ |
Image board(s) populated with track-relevant content |
At least 1 board with real content, not placeholder |
|
☐ |
Upcoming events board posted and dated |
Event title + date visible; past events removed |
|
☐ |
Showcase zone set up for presenter / author work |
Distinct area labelled Showcase or equivalent |
|
☐ |
Presenter / author content loaded or linked |
Confirmed with content owner |
|
|
Conference-Specific Elements |
Criterion / Pass Threshold |
|
☐ |
Greek cultural / scavenger hunt artifact placed (if assigned) |
Confirm with George / Greek team |
|
☐ |
Quest clue placed correctly (if this Frame is a quest stop) |
Cross-check against quest master list |
|
☐ |
Tally.so submission form linked (if track accepts submissions) |
Tally form URL confirmed and tested |
6 Planned Activities & Events
|
Activity / Event |
Date |
Owner |
Status |
|
|
|
|
|
|
|
|
|
|
|
|
|
|
|
|
|
|
|
|
7 Connected Frames & Portals
|
Destination Frame |
Portal Type |
Notes |
|
|
|
|
|
|
|
|
|
|
|
|
|
|
|
|
|
|
|
|
|
|
|
|
8 Asset Inventory
|
Asset Name / Description |
Poly Count |
File Size |
Owner |
|
|
|
|
|
|
|
|
|
|
|
|
|
|
|
|
|
|
|
|
9 Accessibility Sign-Off — reviewer must complete this, not the Frame owner
|
|
Wayfinding & Legibility |
Criterion / Pass Threshold |
|
☐ |
New user orients within 10 seconds without prior knowledge |
Blind test with volunteer |
|
☐ |
All text boards legible on mobile at default eye level |
Phone screen test |
|
☐ |
No element identified by colour or spatial position alone |
Confirmed with audio OFF |
|
|
Inclusivity |
Criterion / Pass Threshold |
|
☐ |
No flashing or strobing effects |
Zero tolerance — photosensitivity risk |
|
☐ |
Critical content accessible from a stationary avatar position |
No movement required to read key boards |
|
☐ |
Language on all boards is plain and welcoming to newcomers |
Reviewed by someone outside Frame team |
|
|
Device & Bandwidth |
Criterion / Pass Threshold |
|
☐ |
Fully usable on Chrome / Edge desktop |
Full navigation completed without crash |
|
☐ |
Usable on iOS Safari mobile |
Full navigation completed without crash or major lag |
|
☐ |
Loads within 30 sec on Slow 3G (Chrome DevTools → Network → Slow 3G) |
Slow 3G test completed and passed |
|
|
Sign-Off |
Criterion / Pass Threshold |
|
☐ |
Reviewer name and date recorded below |
Required before Frame status = Ready |
|
Reviewed By |
|
|
Review Date |
|
|
Outcome |
|
|
Follow-Up Items |
|
10 Codex Integration (BookStack)
|
Codex Book / Chapter |
|
|
Codex Page URL |
|
|
Last Synced |
|
|
Outstanding Codex Tasks |
|
11 Additional Notes & Open Questions
|
|
Debugging & Performance
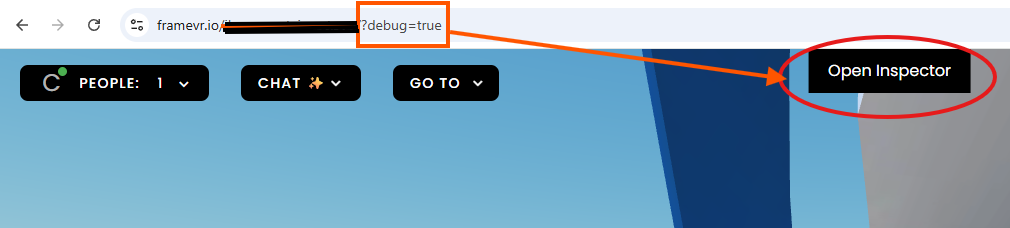
To view the performance in greater depth (beyond what is built into the regular FrameVR menu), add ?debug=true to the end of any FrameVR URL.
Once you have done this and refreshed, you will have the option to "Open Inspector," which will show you a panel with various options to help you understand how well the frame is performing in terms of draw calls and more.
About Building in FrameVR + Advanced Interactions
FrameVR Technical Capabilities
iLRN Campus Codex — Engine, interactivity, and 3D asset support
Under the Hood: Babylon.js
FrameVR is built on Babylon.js, a powerful open-source 3D rendering engine. However, FrameVR abstracts most of Babylon.js’s native functionality behind its own interface. Users work within FrameVR’s sandbox rather than having direct access to the full engine.
Advanced features such as complex physics simulations and custom scripting are not directly accessible within the platform. Teams should work within the Action Editor and supported asset formats to achieve interactivity.
FrameVR Knowledge Base & Other Info
FrameVR offers many valuable resources for users building on their platform. Here are a few of the options available:
Interactivity: The Action Editor
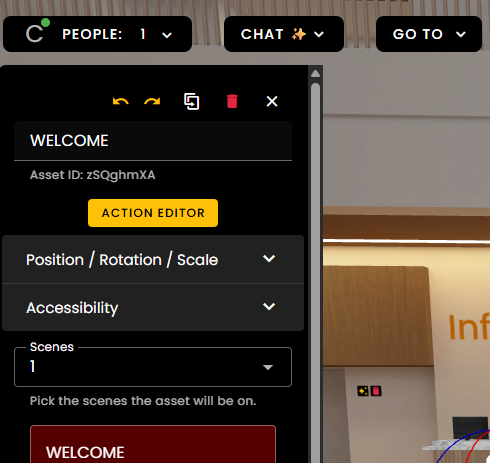
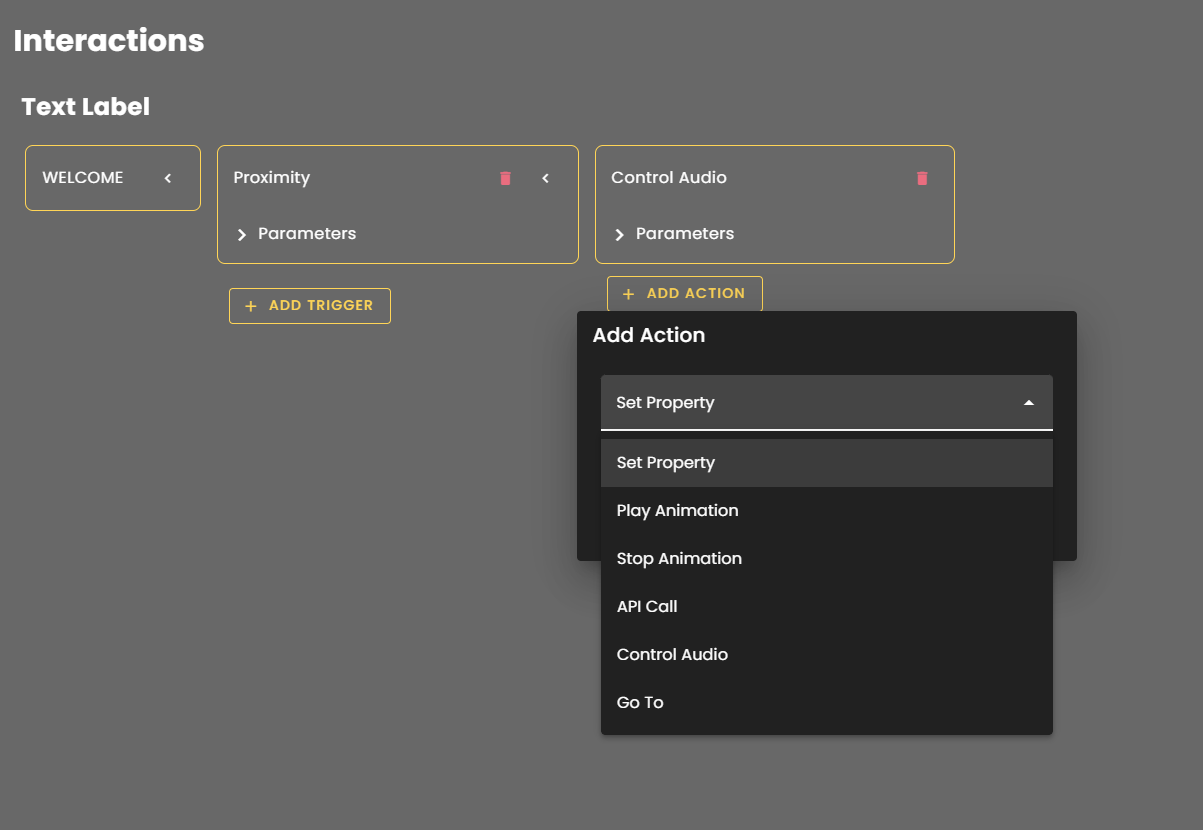
FrameVR’s Action Editor provides a no-code interface for adding interactivity to spaces. While limited compared to full engine access, it supports a meaningful range of triggers and responses:
• Play Audio — Trigger ambient sounds, narration, or sound effects on proximity or interaction
• Animate Models — Activate animation cycles embedded in uploaded 3D assets
• Show / Hide Objects — Toggle visibility of elements based on user actions
• Open URLs — Link out to external content, documents, or media
• Teleport Users — Move participants to different locations within or between spaces
These tools are well-suited for guided experiences, interactive exhibits, and layered storytelling within a campus environment.
Access this tool by entering Edit Mode > Click Asset > Open Action Editor > Set Trigger + Action

3D Assets: glTF Format
FrameVR supports glTF (.glb/.gltf), the widely used open standard for 3D assets. Importantly, glTF files can contain embedded animation cycles, which can then be triggered via the Action Editor — making it possible to bring in animated objects (moving parts, characters, environmental effects) without custom code.
Recommended tools for creating or converting glTF assets:
• Blender (free, open-source) — excellent glTF export with full animation support
• Sketchfab — browse and download community glTF models, many with embedded animations
• Various online converters for existing 3D models
Gaussian Splats: Photorealistic Spatial Capture
FrameVR supports Gaussian Splat files (.ply / .splat), a cutting-edge format for representing real-world spaces with photorealistic quality. Gaussian Splats are captured using photogrammetry-adjacent workflows and rendered as volumetric point clouds, producing immersive, high-fidelity representations of physical locations.
This is a significant capability for campus-building — real landmarks, architectural spaces, or culturally significant sites can be captured and placed directly into a FrameVR environment.
Capture tools to explore:
• Luma AI — mobile-friendly capture, accessible for most devices
• Polycam — supports Gaussian Splat export alongside standard photogrammetry
• Postshot — desktop processing for higher-quality splat results
[DRAFT: Example soon, check back for update! ]
Note: A Gaussian Splat of a nearby landmark is being explored as a demonstration asset for the iLRN campus — a model for how regional teams might contribute place-based content to shared virtual spaces.
Frame Environment Building Options
FrameVR offers three main paths to set up the space inside your Frame. Each works for different skill levels, timelines, and goals — and they can be mixed and matched.
Option 1: Pre-Built Environments
The simplest starting point. FrameVR offers a growing library of ready-made 3D environments — classrooms, auditoriums, galleries, outdoor spaces, and more — that you can select and activate for your Frame with no setup required. These environments are already optimized for performance across desktop, mobile, and VR, making them a reliable choice when accessibility is a priority.
Best for: Meetings, classes, events, and any situation where you need a polished space quickly without customization overhead.
💡 Browse available environments directly inside your Frame settings, or check the FrameVR blog for announcements of new releases.
Option 2: Frame Tile Editor
The Tile Editor (available at tiles.framevr.io) is a drag-and-drop tool that lets you assemble a custom environment by placing pre-made tiles onto a map — no 3D modeling software needed. Once you're happy with the layout, you export it as a .glb file and upload it as your Frame's environment.
Best for: Users who want a custom layout and sense of place without needing Blender or other 3D tools. Great for designing campus-style spaces, custom hallways, or multi-room layouts.
💡 Exported .glb environments from the Tile Editor can also be used in other 3D platforms that support that format.
Option 3: Custom Environments & Dynamic Assets
For maximum creative control, you can upload your own fully custom 3D environment as a .glb file — or use an AI-generated one as your base.
Using World Labs (AI-Generated Environments)
World Labs (Marble) can generate immersive 3D scenes from a prompt or image for your Frame — ancient ruins, modern venues, natural landscapes — which you then export as a .glb and bring directly into Frame as your environment. This is one of the fastest ways to create a space that feels unique and intentional.
Using Your Own 3D Model
If you or a collaborator are working in Blender or another modeling tool, Frame supports uploading fully custom environments with baked lighting, custom navigation meshes, shaders, and more baked directly in.
Layering with Dynamic Assets
Regardless of whether your base environment comes from World Labs or a 3D artist, Frame's Dynamic Asset Library lets you layer functional elements on top — seating, signage, panels, plants, and other objects — directly inside your Frame without re-exporting anything. You can switch seating layouts, rearrange elements, and iterate in real time.
Best for: Events, educational experiences, branded spaces, or any Frame where the environment itself is part of the message.
💡 Dynamic assets from the same model can be duplicated many times without a major performance cost — great for filling seating rows or repeating decorative elements.
For guidance on keeping custom environments accessible across devices, see the Frame Design & Performance Guidelines page in this Codex.
Using Scenes in FrameVR
iLRN 2026 Virtual Campus — Codex
Using Scenes in FrameVR
Draft Areas, Alternate Configurations & Advanced Scene Management
Last Updated: April 10, 2026 | Maintained by: Charlene Hardin
Codex Section: FrameVR Build Documentation
What Are Scenes?
Scenes are one of FrameVR’s most useful but least understood features. At its simplest, a Scene is a saved state of your Frame — everything in it, where it is, and how it’s configured. A single Frame can have multiple Scenes, and you can switch between them instantly.
Think of Scenes like different “slides” of the same room. The Frame URL stays the same, but the contents of the space can change completely depending on which Scene is active. Visitors always enter whichever Scene is currently set as the active one.
Why This Matters for Building
When you’re actively developing a Frame, you don’t always want your work-in-progress visible to everyone who walks in. Scenes solve this by letting you maintain a “live” version of the space while building and experimenting in a separate draft state — all within the same Frame URL.
This means you can iterate freely without worrying about visitors stumbling into half-finished layouts, test new asset placements without disrupting the live experience, and preserve a clean baseline you can always return to.
Common Uses
• Draft mode — Build and test new layouts or assets in a Scene without affecting what visitors see when they arrive
• Event configuration — Set up a Scene specifically for a live session (with a presenter screen, specific seating arrangement, etc.) and switch back to the standard configuration afterward
• Preservation — Save a clean baseline Scene before making major changes, so you can always revert if something goes wrong
• Seasonal or programming variation — Configure different Scenes for different activities within the same Branch House without needing separate Frame URLs
How to Create and Switch Scenes
|
|

|
|

Important: What Carries Across All Scenes
Not everything is Scene-specific. Certain elements are persistent across all Scenes in a Frame regardless of which Scene is active.
|
Watch out: Built-in Web Browsers The built-in web browser is one of the most notable persistent elements — if you have a browser open or configured in your Frame, it will be visible and active in every Scene. Keep this in mind when planning your layout, particularly if you’re using a browser for a specific event or presentation and don’t want it to appear in your standard visitor-facing Scene. |
As a general rule: if you’re unsure whether an element is Scene-specific, test it in a draft Scene before relying on it in a live configuration. For more information, always consult FrameVR’s Knowledgebase.
Things to Know
• The Scene that loads by default when someone enters your Frame URL is whichever Scene is currently set as active
• Switching Scenes affects all visitors currently in the Frame — coordinate with your team before switching during a live event
• Asset budgets apply across your whole Frame, not per Scene — a heavily loaded draft Scene still counts toward your performance limits even if it isn’t the active one
Recommended Practice for iLRN Builders
Keep at least two Scenes in any Frame you are actively developing:
|
LIVE |
The current visitor-facing version. This is what people see when they enter the Frame. Only update this Scene when changes are ready to go live. |
|
DRAFT |
Your active working area. Build, test, and experiment here freely. Keep this Scene clearly named so anyone with build access knows not to set it as active by mistake. |
Name your Scenes clearly and consistently. Avoid generic names like “Scene 1” or “Scene 2” — use descriptive labels that make the purpose immediately obvious to any team member who opens the Frame settings.
Advanced Features
Triggering Scene Changes with the Editing Panel
This opens possibilities for guided experiences, event transitions, and interactive storytelling within a single Frame. A persistent navigation element that appears in all Scenes and triggers transitions between them is one practical application.
|
|

Setting Items to Appear Across Multiple Scenes
By default, assets you place in a Frame are associated with the Scene you’re working in. However, when editing an individual item, you can configure it to appear in multiple Scenes simultaneously.
This is useful for elements that should be consistent across several configurations — like permanent signage, a logo, navigation buttons, or a welcome poster — without having to duplicate them manually in each Scene.
|
|

Quick Reference
|
Question |
Answer |
|
Does the Frame URL change between Scenes? |
No. The Frame URL stays the same regardless of which Scene is active. |
|
Can visitors switch Scenes themselves? |
Only if you set up an Action Editor trigger they can interact with. Otherwise only admins/builders can switch Scenes. |
|
Do asset budgets apply per Scene? |
No. Budgets apply to the whole Frame. All Scenes count toward your total. |
|
Are web browsers Scene-specific? |
No. Built-in web browsers are persistent across all Scenes. |
|
Can I make an asset appear in multiple Scenes? |
Yes. Edit the item and set it to appear in whichever Scenes you choose. |
Questions or corrections? Contact the iLRN build team via Discord or the Codex discussion thread.