Using Scenes in FrameVR
iLRN 2026 Virtual Campus — Codex
Using Scenes in FrameVR
Draft Areas, Alternate Configurations & Advanced Scene Management
Last Updated: April 10, 2026 | Maintained by: Charlene Hardin
Codex Section: FrameVR Build Documentation
What Are Scenes?
Scenes are one of FrameVR’s most useful but least understood features. At its simplest, a Scene is a saved state of your Frame — everything in it, where it is, and how it’s configured. A single Frame can have multiple Scenes, and you can switch between them instantly.
Think of Scenes like different “slides” of the same room. The Frame URL stays the same, but the contents of the space can change completely depending on which Scene is active. Visitors always enter whichever Scene is currently set as the active one.
Why This Matters for Building
When you’re actively developing a Frame, you don’t always want your work-in-progress visible to everyone who walks in. Scenes solve this by letting you maintain a “live” version of the space while building and experimenting in a separate draft state — all within the same Frame URL.
This means you can iterate freely without worrying about visitors stumbling into half-finished layouts, test new asset placements without disrupting the live experience, and preserve a clean baseline you can always return to.
Common Uses
• Draft mode — Build and test new layouts or assets in a Scene without affecting what visitors see when they arrive
• Event configuration — Set up a Scene specifically for a live session (with a presenter screen, specific seating arrangement, etc.) and switch back to the standard configuration afterward
• Preservation — Save a clean baseline Scene before making major changes, so you can always revert if something goes wrong
• Seasonal or programming variation — Configure different Scenes for different activities within the same Branch House without needing separate Frame URLs
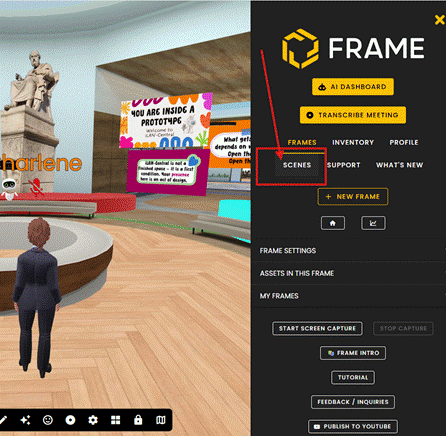
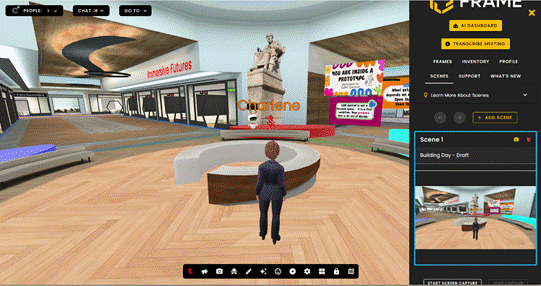
How to Create and Switch Scenes
|
|
|
|
Important: What Carries Across All Scenes
Not everything is Scene-specific. Certain elements are persistent across all Scenes in a Frame regardless of which Scene is active.
|
Watch out: Built-in Web Browsers The built-in web browser is one of the most notable persistent elements — if you have a browser open or configured in your Frame, it will be visible and active in every Scene. Keep this in mind when planning your layout, particularly if you’re using a browser for a specific event or presentation and don’t want it to appear in your standard visitor-facing Scene. |
As a general rule: if you’re unsure whether an element is Scene-specific, test it in a draft Scene before relying on it in a live configuration. For more information, always consult FrameVR’s Knowledgebase.
Things to Know
• The Scene that loads by default when someone enters your Frame URL is whichever Scene is currently set as active
• Switching Scenes affects all visitors currently in the Frame — coordinate with your team before switching during a live event
• Asset budgets apply across your whole Frame, not per Scene — a heavily loaded draft Scene still counts toward your performance limits even if it isn’t the active one
Recommended Practice for iLRN Builders
Keep at least two Scenes in any Frame you are actively developing:
|
LIVE |
The current visitor-facing version. This is what people see when they enter the Frame. Only update this Scene when changes are ready to go live. |
|
DRAFT |
Your active working area. Build, test, and experiment here freely. Keep this Scene clearly named so anyone with build access knows not to set it as active by mistake. |
Name your Scenes clearly and consistently. Avoid generic names like “Scene 1” or “Scene 2” — use descriptive labels that make the purpose immediately obvious to any team member who opens the Frame settings.
Advanced Features
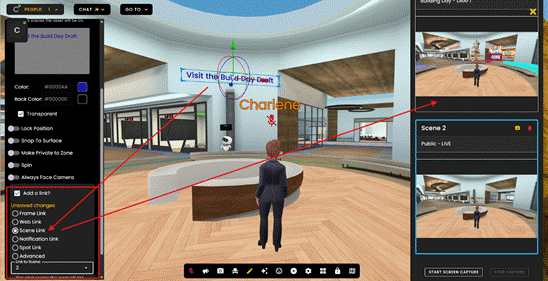
Triggering Scene Changes with the Editing Panel
This opens possibilities for guided experiences, event transitions, and interactive storytelling within a single Frame. A persistent navigation element that appears in all Scenes and triggers transitions between them is one practical application.
|
|
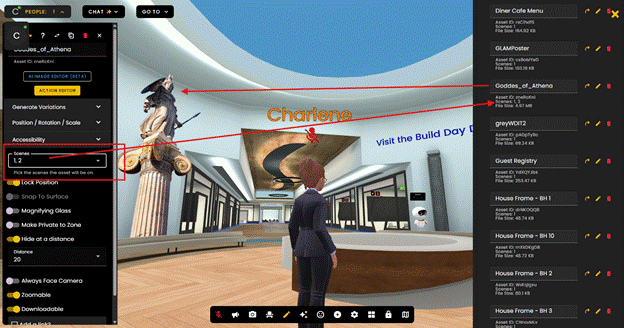
Setting Items to Appear Across Multiple Scenes
By default, assets you place in a Frame are associated with the Scene you’re working in. However, when editing an individual item, you can configure it to appear in multiple Scenes simultaneously.
This is useful for elements that should be consistent across several configurations — like permanent signage, a logo, navigation buttons, or a welcome poster — without having to duplicate them manually in each Scene.
|
|
Quick Reference
|
Question |
Answer |
|
Does the Frame URL change between Scenes? |
No. The Frame URL stays the same regardless of which Scene is active. |
|
Can visitors switch Scenes themselves? |
Only if you set up an Action Editor trigger they can interact with. Otherwise only admins/builders can switch Scenes. |
|
Do asset budgets apply per Scene? |
No. Budgets apply to the whole Frame. All Scenes count toward your total. |
|
Are web browsers Scene-specific? |
No. Built-in web browsers are persistent across all Scenes. |
|
Can I make an asset appear in multiple Scenes? |
Yes. Edit the item and set it to appear in whichever Scenes you choose. |
Questions or corrections? Contact the iLRN build team via Discord or the Codex discussion thread.
No comments to display
No comments to display